After many years with with Windows Server 2008 R2, we received over 200 different Windows Updates. The c:\ partition grows year after year. Among other things, Windows Updates creates uninstall information for every installed update. So if you ever needed, you could revert a single update. There are systems where this is crucial, but there are also many Windows Servers, where we know that this will never be necessary. In this case, you have the ability to use cleanmgr.exe to remove the following things automatically:
- Downloaded Program Files
- Internet Cache Files
- Offline Pages Files
- Previous Installations
- Recycle Bin
- Service Pack Cleanup
- Temporary Setup Files
- Thumbnail Cache
- Update Cleanup
- Upgrade Discarded Files
- Windows Upgrade Log Files
The trouble is, that these options are only available, if you install the Desktop Experience feature. And we all know that we don’t want that on each and every system.
But there is a solution, although it’s unsupported. This description, although thoroughly tested, is provided as-is, and I grant no warranty.
The trick is, to copy the needed files installed by Desktop Experience, to a Windows Server without Desktop experience. You can find the files here, without installing Desktop Experience:
- C:\Windows\winsxs\amd64_microsoft-windows-cleanmgr_31bf3856ad364e35_6.1.7600.16385_none_c9392808773cd7da\cleanmgr.exe
- C:\Windows\winsxs\amd64_microsoft-windows-cleanmgr.resources_31bf3856ad364e35_6.1.7600.16385_en-us_b9cb6194b257cc63\cleanmgr.exe.mui
The files then have to be copied over here:
- %systemroot%\System32\cleanmgr.exe
- %systemroot%\System32\de-DE\cleanmgr.exe.mui
- %systemroot%\System32\en-US\cleanmgr.exe.mui
After that, it is possible to create predefined cleanup sets, called sageset, which you can later refer to. These settings are written into the registry. I created these settings once on a test server and use them since then. You can reuse them, if you would like to or recreate them for yourself.
Windows Registry Editor Version 5.00

[HKEY_LOCAL_MACHINE\SOFTWARE\Microsoft\Windows\CurrentVersion\Explorer\VolumeCaches\Downloaded Program Files]
"StateFlags0066"=dword:00000002

[HKEY_LOCAL_MACHINE\SOFTWARE\Microsoft\Windows\CurrentVersion\Explorer\VolumeCaches\Internet Cache Files]
"StateFlags0066"=dword:00000002

[HKEY_LOCAL_MACHINE\SOFTWARE\Microsoft\Windows\CurrentVersion\Explorer\VolumeCaches\Offline Pages Files]
"StateFlags0066"=dword:00000002

[HKEY_LOCAL_MACHINE\SOFTWARE\Microsoft\Windows\CurrentVersion\Explorer\VolumeCaches\Previous Installations]
"StateFlags0066"=dword:00000002

[HKEY_LOCAL_MACHINE\SOFTWARE\Microsoft\Windows\CurrentVersion\Explorer\VolumeCaches\Recycle Bin]
"StateFlags0066"=dword:00000002

[HKEY_LOCAL_MACHINE\SOFTWARE\Microsoft\Windows\CurrentVersion\Explorer\VolumeCaches\Service Pack Cleanup]
"StateFlags0066"=dword:00000002

[HKEY_LOCAL_MACHINE\SOFTWARE\Microsoft\Windows\CurrentVersion\Explorer\VolumeCaches\Temporary Setup Files]
"StateFlags0066"=dword:00000002

[HKEY_LOCAL_MACHINE\SOFTWARE\Microsoft\Windows\CurrentVersion\Explorer\VolumeCaches\Thumbnail Cache]
"StateFlags0066"=dword:00000002

[HKEY_LOCAL_MACHINE\SOFTWARE\Microsoft\Windows\CurrentVersion\Explorer\VolumeCaches\Update Cleanup]
"StateFlags0066"=dword:00000002

[HKEY_LOCAL_MACHINE\SOFTWARE\Microsoft\Windows\CurrentVersion\Explorer\VolumeCaches\Upgrade Discarded Files]
"StateFlags0066"=dword:00000002

[HKEY_LOCAL_MACHINE\SOFTWARE\Microsoft\Windows\CurrentVersion\Explorer\VolumeCaches\Windows Upgrade Log Files]
"StateFlags0066"=dword:00000002
After everything has been prepared accordingly, you can start an elevated command prompt end execute the sageset via sagerun:
cleanmgr.exe /sagerun:66
This may take a while, often 1-2 hours. After the command has been successfully executed, the system needs a reboot. During this reboot the cleanup will continue, so don’t bother if it takes alot longer than normally. On my first 9 test servers this purged about 7 GB on each server!
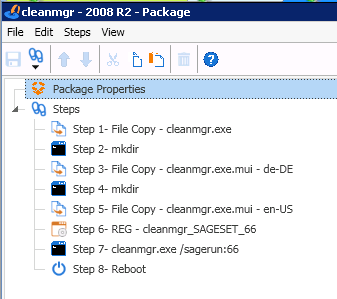
The steps provided above require a few manuell performed configurations. And we all know, that automation is the key to solve this. At my company, we use PDQ Deploy to automate such tasks. Below is a screenshot of my selfmade Deploy Package and the XML file as download.
 |
I hope I could help a few people out there, and if you have any questions, please leave me a comment.